The Org Chart link, available from the Organize tab in your Tool Bar, opens the Organization Chart search tool which allows you to quickly access and manage your organizational hierarchy.
Note: Some of the features available in Premium Mobile may be restricted by your administrator.
To add a sub-department to a department within your organizational hierarchy, perform the following steps:
1. From the Organize tab in your Tool Bar, click Org Chart.
2. In the Organization Chart screen:

By default, all departments are collapsed under the highest parent department with no employees displayed.
For more information about navigating the Organization Chart, see Org Chart.
a. You may select a point in the Hierarchy drop-down list to search only that hierarchy.
b. Select a Department from the drop-down list.
The Department drop-down list displays the departments within your selected Hierarchy.
To quickly locate a Department level, you may enter a partial department reference in the QuickFind text box.
You may expand or collapse the display of your departmental structure. Click the + symbol to expand and display underlying sub-departments. Click the – symbol to collapse the listings. If a department does not have either of these symbols next to it, then it has no underlying sub-departments. If available, you may use the scroll bar in the middle of your screen to view all of your departments.
c. Click a department to add it to your Working Set.
You may un-check an item in your Working Set to remove it from the set.
d. Select the department in your Working Set.

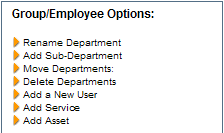
e. In the Group/Employee Options, click the Add Sub-Department link.

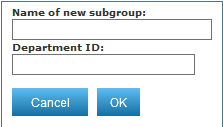
f. In the Name of new subgroup section, enter your new sub-department name and department ID, and click the OK button.
